Root Cause 1 Tab
The in-frame sidebar text will be very useful for the next few steps. It will explain how the fishbone and 5 Whys processes work, and how to use them to determine root cause. They should be used in conjunction with a safety meeting or other incident review. They help to document the decisions made in the review of the incident.
Select the fishbone you’d like to use from the dropdown menu. Three templates are provided, with 6M being the most commonly used. Pick the best fit for your organization. You may also select to skip this step if you have your own root cause software or other established process. Please note: if you select to skip the root cause step 1 the system will require you to enter the “Significant” factor before you can proceed to the second step or close the case.
Click Add Factor. Enter a Causal Factor – a factor you and your team believe to have been an influence in the incident.
Select Significant or Not Significant for the Indicate Factor drop-down menu. This is subjective, but in general pick ‘significant’ for a factor that you or your organization can control.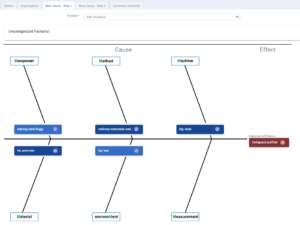
You now have two options. You can choose the branch now that you wish to place the factor (and this can be changed later). Select the chosen branch from the options available with your chosen diagram. You can also leave this uncategorized for now and can assign it later after your safety team has met and brain-stormed options.
Click Create and the factor will load into the selected branch on the fishbone diagram or appear in the Uncategorized Factor(s) box. Dark blue factors are significant factors, sky blue factors are insignificant. You may edit a factor simply by clicking the edit button in the factor box, changing details as necessary, then clicking Update.
Click Save and Exit to return later, otherwise Save and Continue. Please note that the green Save and Continue button will not be enabled until there is at least one Significant Factor included on your fishbone.
Root Cause 2 Tab
Factors identified as significant in the previous step will pre-populate on this page. For each factor you have the option of proceeding with the 5 Whys analysis, or providing a root cause determined through an independent procedure and writing your own justification. Decide which you will do by checking your preferred option in the Reasoning Method option
Five Whys: Select the most appropriate hazard from the Primary Hazard dropdown box. The hazards available for selection will be those hazards made active in the Settings menu. If you do not see a hazard that is suitable, return to Settings à Hazards and move the appropriate hazard from the Archived menu to the Active menu.
Now follow the 5 Why process. If you are unfamiliar with it, the sidebar text in the app will explain how it is done. Enter your responses in the text boxes available until you reach what you think is the root cause up to a maximum of five responses. Copy and paste the final response into the root cause ox, or write a more expansive reasoning (but based on your last response), to suit.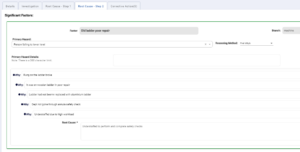
If you choose not to perform a 5 Why procedure, then select the ‘Write Your Own‘ option in the drop down. Select the primary hazard and then in the text boxes provided, type your own reasoning/process and root cause determination based on your organizations own root cause procedures.
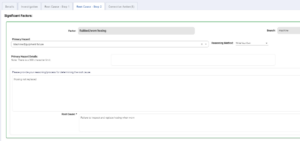
Click Save and Exit or Save and Continue as needed.