Your course needs may change, but it doesn’t have to be difficult: un-assigning a course allows you to completely remove the assignment from selected users easily. Depending on your User Type’s permissions will determine if you have access to the Edit Assignments feature. For more information about User Types and permissions please review these two articles: Creating User Types for SafetySkills Engage and SafetySkills Empower and User Permissions for SafetySkills Engage. Please note that you can only un-assign active courses; once a course has been completed that record cannot be removed.
If you are looking to un-assign a course that is flagged as “Auto Assigned” you will need to access the “Automatic Assigning” feature to modify that assignment. If you have access to this feature you will see it listed on the menu in the Learning Management section. Select “Automatic Assigning,” if you have the option then select the group you wish to edit.
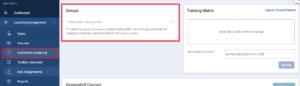
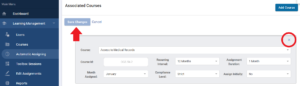
Once you have selected the group the assigned courses for that group will populate below in the “Associated Courses” box. Then, find the course you wish to un-assign from the group and click the “x” button on the top right corner of the course box.
The course will disappear from the list. Repeat as needed for any other courses for this group, and click the blue “Save Changes” button located on the left of the course lists (top or bottom of the list). You must click to save changes for each group before selecting a new group to edit or your changes will not be saved. For more information on Automatic Assigning, please review How To Create Automatic Assignments.
 There are two ways to un-assign a course that has been manually assigned, whether for a group or single user(s):
The first way to un-assign courses that have been manually assigned to group(s) or specific user(s) is through the “Edit Assignments” page. When you click on the “Edit Assignments” from the menu, a grid view will populate for the account’s entire assignment history (some administrators will only be able to view the group(s) they have been assigned).
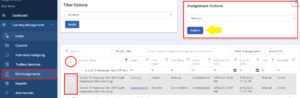
You may use the “Filter Options” drop-down at the top to select which specific group you are wanting to view. Once you have selected the group, click the blue “Apply” button. The course history for that group will populate the grid view.
Please note: courses that have been assigned manually and through auto-assign will populate in the grid. If you select courses with the type of “Auto Assigned” those assignments will not be removed with the manual unassigned actions.
You can manipulate the grid view to show you specific information in a variety of ways: by selecting the “Course Name” column drop-down and selecting the name of the course, it will pull in only the selected course data. You may also sort by searching specific user names in the “First Name” and “Last Name” columns, or by most recent date by selecting the “Activation Date” column.
Once you have located the course(s) you wish to un-assign, you will need to select them. If you want to only un-assign the selected course from a specific user, only check the box in the far-left column in the row for that user.
If you are wanting to un-assign everything populating in the grid view, check the box at the top of the far left column.
Once you have selected the course(s) in the grid view you wish to un-assign, you will need to go to the “Assignment Actions” drop-down box in the top right corner above the grid view. From here, you can choose “Unassign.”
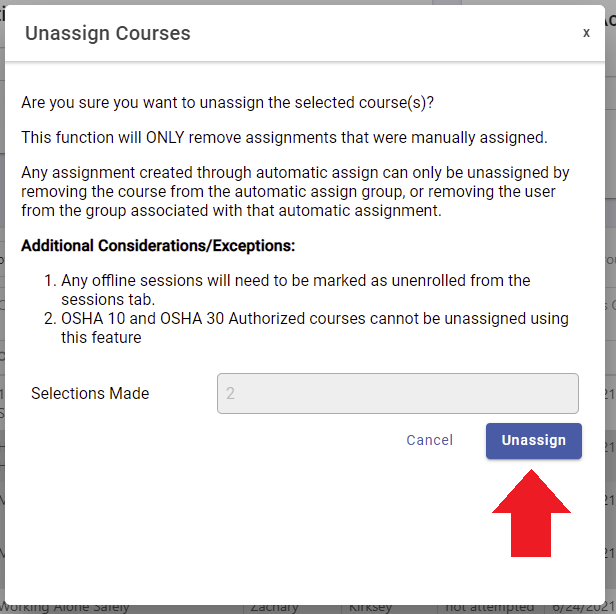
Once you have selected “Unassign” from the drop-down, you will need to click the blue “Submit” button. This will prompt a pop-up box asking you to confirm the number of selections you have made to un-assign.
Once you review the pop-up and click the blue “Continue” button, the course(s) you selected will be un-assigned. Please note: un-assigning courses will remove them from the user(s) and will not populate in their training history.
The second way to un-assign a course that has been manually assigned to a user is through the users profile. To do this click on the “Users” option in the menu. Once you are on the “Users” page a list of all the active users in the account will populate (some administrators will only be able to view the group(s) they have been assigned).
From here, you will click on the blue “Login” name of the user you are wanting to un-assign a course from.
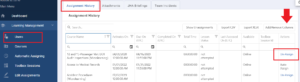
Clicking on the blue “Login” name of the user will open that user’s profile. Down at the bottom is a grid view of that user’s “Assignment History” including current assignments. You may need to change the grid view to sort by lesson status to view the “not attempted” or “incomplete” assignments both of which can be un-assigned.
Once you have located the course(s) you wish to un-assign, you will look to the last column of the grid view on the right, if it has a link that says “Un-Assign” you can click the link to un-assign that course.
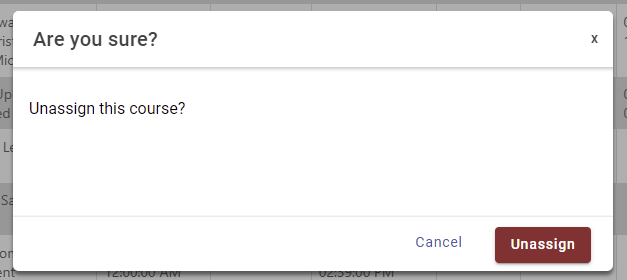
Clicking the “Un-Assign” link will prompt a pop-up asking you to confirm the action. Once you have followed the prompts of the pop-up, the course will be un-assigned from that user. Please note that you will have to follow the steps above for each user individually, even if you are un-assigning the same course.
If you have any questions or need any assistance with un-assigning courses, please contact the SafetySkills Help Desk by emailing support@safetyskills.com or calling the Help Desk at 405-463-6656, option 2.