OSHA 300 RECORDING
Any injury that requires more than just first aid must be recording using the OSHA 300 series of forms. Select the Form you wish to access from the menu. All three forms provided here replicate the exact fields in the OSHA published versions and may legally be used in lieu of these.
Completing the 301 Incident Report Form
Click on the name of the employee for which you wish to complete the 301 Injury Report. The form was generated during the investigation stage when OSHA 300 Recording option was selected.
The 301 is auto-filled with field data that has already been input as part of the investigation process.
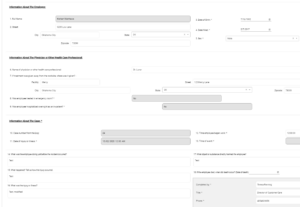
Complete the remaining fields by section:
Information About The Employee:
Enter brief personal details about the employee. These must be exact and taken from HR records if needed
Information About The Physician or Other Health Care Professional:
Add medical details based on information gathered during the investigation process.
Information About The Case:
Enter information about the case that you believe to be true based on the documented evidence collected during the investigation process
When all fields have been filled, add your name, title, phone number and date in the box shown.
You may save the report at any time, whether complete or not and access it from the 301 menu. There is a button at the top right corner of this screen to print the report
Completing the 300 Log of Injuries and illnesses Form
From the menu side bar, select OSHA 300 Reporting à OSHA 300 Log.
The log of submitted reports is visible (defaulted to the current year). You may filter the report by selecting the chosen establishment and year from the drop-down boxes.
To complete an entry DO NOT CHECK THE BOXES ON THE FORM. The form is a faithful reproduction of OSHA produced forms, but data is entered differently. To complete a record, click on the name of the employee (Column (B)) to open up a pop-up.
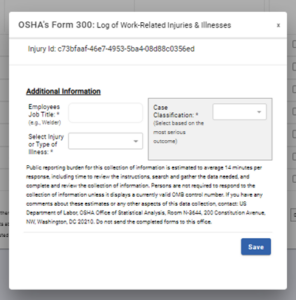
Enter the employee’s job title and select the type of injury or illness suffered. In the gray box, complete the case classification details, including entering the days away from work or job transferred or restricted for the relevant option chosen. Then click save and you’ll see the results populate in the record in the form. If it does not show immediately, refresh the page in your browser.
Completing the 300A Summary
Select the OSHA 300A option from the OSHA 300 Reporting header in the main menu. Any reports already generated will be visible, and you may click on the auto-generated ID in the first column to view them.
To begin a new summary form, click on Create New 300A Report. This will open the New 300A Report pop-up. Enter the Establishment you wish to generate the summary for, and also the year. When you do this, text boxes will reveal for Annual average number of employees, and Total hours worked by all employees last year. Enter the values, and the sidebar text in the app will provide guidance on how to calculate these. Click Generate.
![]()
To view or edit the summary form, click on the auto-generated ID in the first column. This will open the 300A summary for that establishment and year. You will see that all information input to this point relating to that establishment will have auto-filled in the form.
The form can now be printed by clicking the button on the top right of the screen, and then the signatory information hand-written by a company executive prior to display. See the sidebar text in the app for annual 300A display requirements, and also for reporting this information directly to OSHA for non-exempt organizations.