To download a PDF of this article, please click here.
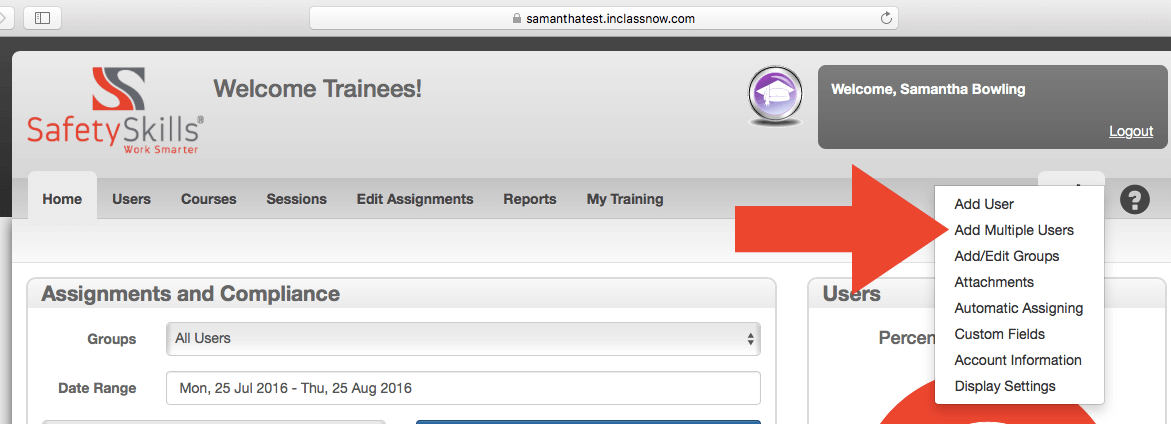
To get started, click on the Configure tab (looks like two gears) and select “Add Multiple Users” from the drop-down menu.
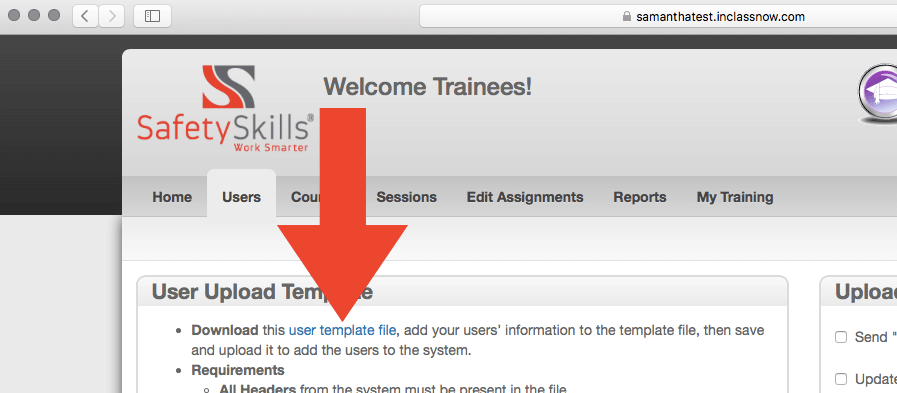
On the left side of the screen, you will see the blue link to download the “user template file.” This file, like all other default exports from the LMS, will export a Comma Delimited or CSV file. You will use this template to upload multiple users to your account.
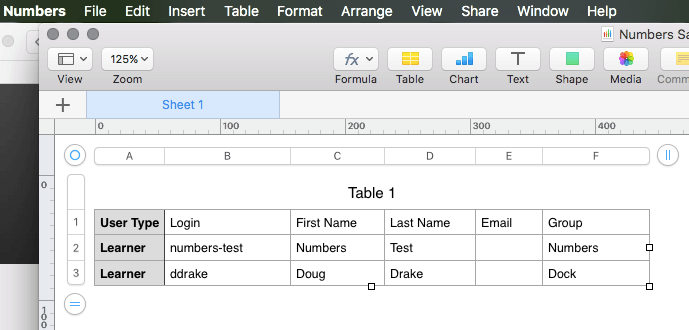
When you open the blank “user template file” in Numbers, you will see only the column headers. You must add rows to begin entering data to the file.
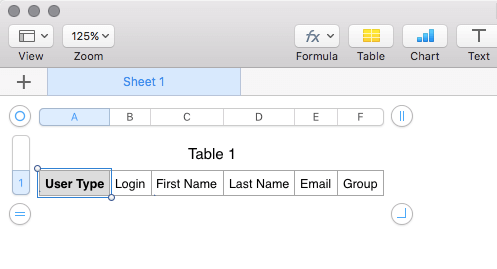
The user template file will contain all of the headers that exist in the account at the time you export the file. These headers must be present to successfully upload the file and add users. If you have additional Custom Fields, these will also be on the template. If you would like to utilize additional fields, the Owner of the account can add Custom Fields. As long as the column headers on the import file match the fields in the LMS exactly, the sheet will upload without errors.
You must fill out columns A through D (user type, login, first name, last name). The other columns pertain to creating and managing groups and custom fields for your users. To learn more about that process, you can go here and here.
User Type:
There are three available user types to choose from. You must use one of these three:
- Super Administrator: Able to view, assign, and run reports on all users in the system
- Administrator: May be granted access to certain groups; able to view, assign, and run reports only for users in those groups
- Learner: Only able to view and take training assigned to them
Login:
A user’s login must be at least four characters, and unique to that specific user. You may use their email address as their login if you wish, or any combination of letters and numbers.
Email:
You may choose to enter an email address for your users (column E). This will allow you to send reminder notifications to them about upcoming or newly assigned training courses. However, you may not duplicate email addresses in the system.
Depending on your account type there may be a limit to the number of users you can add to your account. If you’re utilizing an EnterpriserPro account, your seat count and active users will be listed on the Home tab of the LMS. You can add users until your seat limit is reached.
If you are utilizing one of our account types where you pay for credits, there is no limit to the number of active users you can put in your account.
You can either type data into the file or copy and paste from an existing file. If your user data is available in another file format you should be able to edit your file in Numbers. You will need to add the column headers as they line up to the LMS. Again, the required column headers are “User Type,” “Login,” “First Name,” “Last Name,” “Email,” and “Group”. If you have added any “Custom Fields” to the LMS you will need to add those fields to the file as column headers as well.
Make sure you have removed any blank rows, columns or cells as needed. There should be no extra blank rows, columns or cells in the sheet. There should be only 1 sheet in the file.
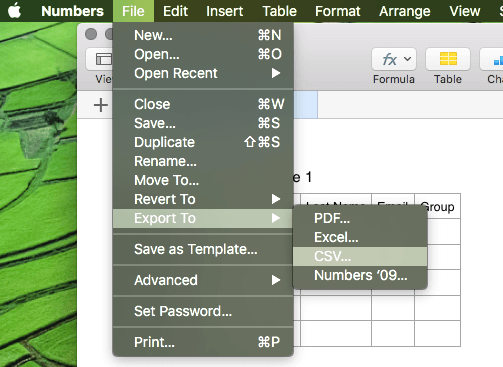
When you have successfully completed filling out the template file, you will export the file from Numbers to a CSV file. To do this click “File >Export To > CSV…”. Your computer will then prompt you to name and save the file.
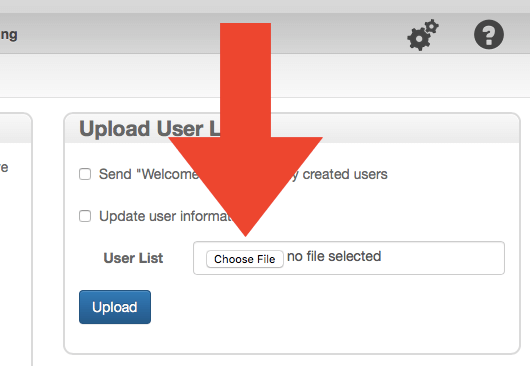
To import the file to the LMS, go back to the “Add Multiple Users” feature from the Configure tab. Click “Choose File” to browse your computer and find the CSV file you exported.
Once you have located the file you would like to import, click “Choose” or double-click on the file name.
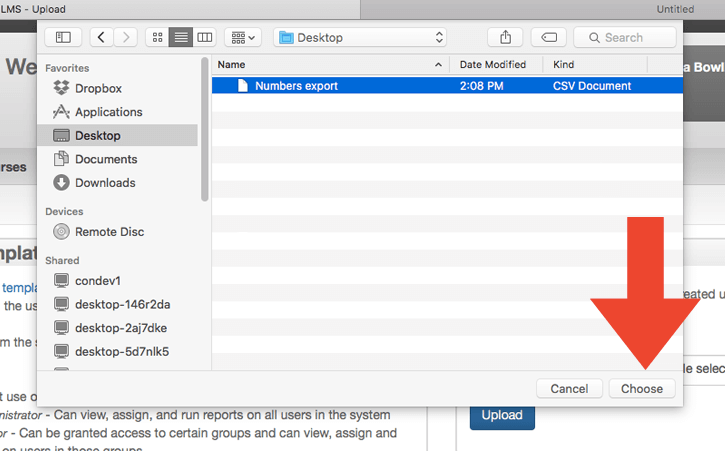
The name of the file should now populate next to the “Choose File” button on the “Add Multiple Users” page.
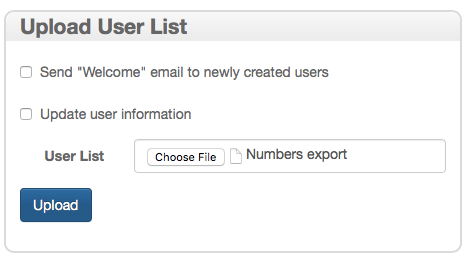
If you have listed existing users on your file, be sure to check the “Update User Information” box before you click “Upload” so that the LMS knows to update existing user information. Otherwise, you will receive an error report.
After you have the file selected, click the blue “Upload” button to import the user list into the LMS.
After the file has been processed, the LMS will tell you the number of users added, updated, or if there were any errors. If errors occur while processing your file, please save the error report and review the error messages. If you have any questions or need any help correcting the errors, please email the SafetySkills customer care team at support@safetyskills.com and include a copy of the error report you received so we can take a look and let you know how to resolve the errors.