Groups utilize the information in the “Custom User Fields” to sort your users. Custom User Fields allow you to add key information about the user, such as their status, location, position, or any other relevant information, for up to 18 fields. For more information on how to create the custom fields you need for your groups, please review How To Configure Custom Fields/Attributes for Learners. To edit a group you have already created, please review How to View and Edit Custom Groups
How you create your groups will depend on the information you entered for the Custom User Fields. When creating your custom fields, you had to choose between a “select” or “multiselect” type that provided a drop-down list of options for filtering, or a “text” type, which allows you to manually enter the information into that field.
To create a group, from the main menu, click on the Setting section, then select “User Groups.”
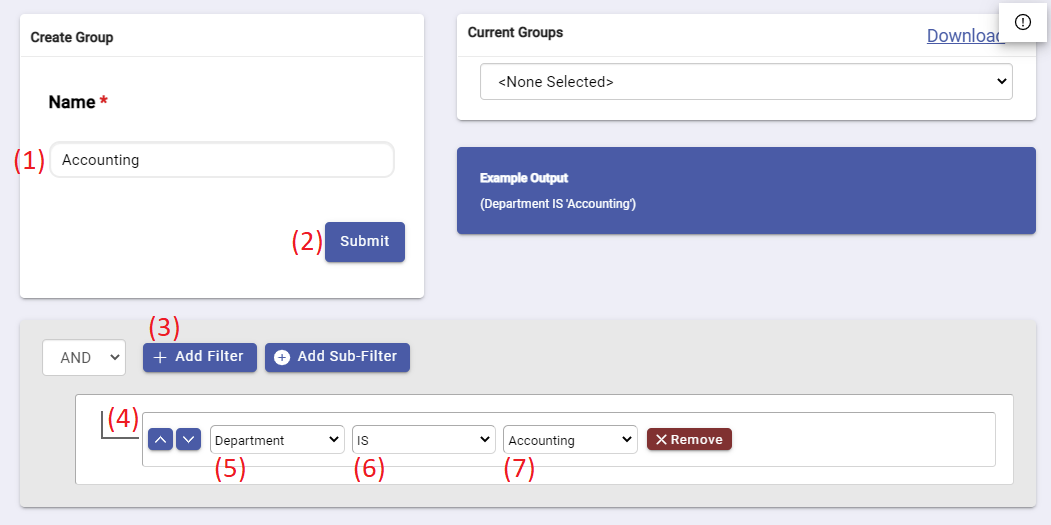
On the left, under “Create Group,” you will enter the name of the group you would like to create (1). This can be a region name, a department name, or any other name that will help identify and distinguish that group.
Before clicking submit (2), you will need to set the filters to sort people into this group. This is going to allow you to add the filters for the LMS to sort the appropriate users into the group. The filters are built using queries to look at your custom fields, so think of the process as building a statement.
To begin, click the “+ Add Filter” button (3). This will generate a new line of boxes, allowing you to choose your settings (4).
- The first box is a drop-down, allowing you to select which field the system should begin sorting by (5).
- The second box is a drop-down containing your qualifier options (6), depending on the custom field type you chose: Is, Is Not, Contains, Does Not Contain, Includes and Does Not Include. Please note that using “Contains” and “Does Not Contain” will broaden your filters and consequently slow down some actions in the your LMS such as reporting and editing assignments.
- The third box will depend on the settings you selected when entering your Custom User Fields (7).
If you used the “select” or “multiselect” option for your Custom User Fields type, the final box will allow you to select one of those options from the drop-down. Remember, this is based off of the fields you created, so if you aren’t seeing the option you need, you may need to go back in and add it. If you used the “text” type option for your Custom Fields, the final box will require you to enter information manually. Please note that the information entered must match exactly. For example, “Assistant Manager” and “Asst Mgr” will not filter the same.
For example, if you created an “Accounting” group, and you wanted to filter anyone with their Department listed as Accounting, you would select “Department” in the first drop-down (5), “Is” in the second (6), and “Accounting” in the third (7).
Groups with multiple filters
When you have the need to use multiple profile attributes to filter people you can do so because groups can have multiple filters. These are only two examples of ways to possibly setup multiple filters. These settings can be “And” queries if you would like both filters to apply to the group, or “Or” queries if it should filter in users that meet any of the listed criteria.
When using multiple filters the “Example Output” can help you confirm you will get the desired results.
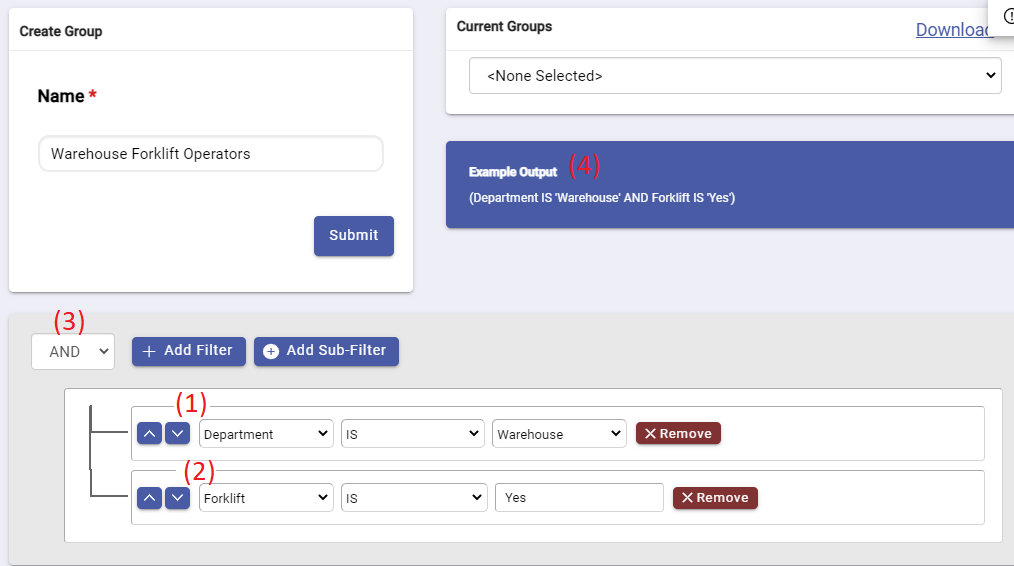
Example one, you need a group for “Warehouse Forklift Operators.” In this example you will use two field to define the group, “Department” a select list, as well as a field to indicate specific people that need forklift training, “Forklift” a text field. In this example the “Forklift” field is being used to indicate a one-off or special need for training about forklifts. The field is labeled “Forklift” and the value in the profiles will be “Yes” when the user interacts with forklifts in such a way that they need to be grouped.
To setup a group that will use both Department and Forklift fields you would setup “Department Is Warehouse,” (1) and then add another query, with “Forklift Is Yes” (2). You want both filters to work together to filter down your people so you would connect the filters with “And.” (3) Review the example output (4) as though it’s a sentence, this group will return everyone who’s department is warehouse, and forklift is yes. (4)
Example two, you may need to group all Welders, whether their “Job Title” is Welder I, Welder II, or Welder III. In this example the “Job Title” field is a milti-select field. this means that the profile could contain one or multiple options in that field. This being the case the To do this, you have 2 options. You can would change the “And” in the upper left corner to “Or.” Then, create each filter that lists “Job Title” in the first box, “Is” in the second, and “Welder I,” “Welder II,” or “Welder III” in the third box.
You may also need to build groups with both “And” and “Or” queries. This is called nested grouping. To begin, create your first query by using the “Add Sub-Filter” button, this will add a box to the page, inside that box click the “+Add Filter” button. Repeat as needed to build your grouped filter.
For example, we may want to look at any employees in both Houston and Dallas that do the same job. You would need to use the “Add Sub-Filter” to setup the locations and then a different sub-filter section to setup the jobs. You would join these options with the “AND” option. If you needed to group the Forklift Operators and Welder I, from both Houston and Dallas your group filters would be something like this: Location is Houston or Dallas, AND, Job Title is Forklift Operator or Welder I
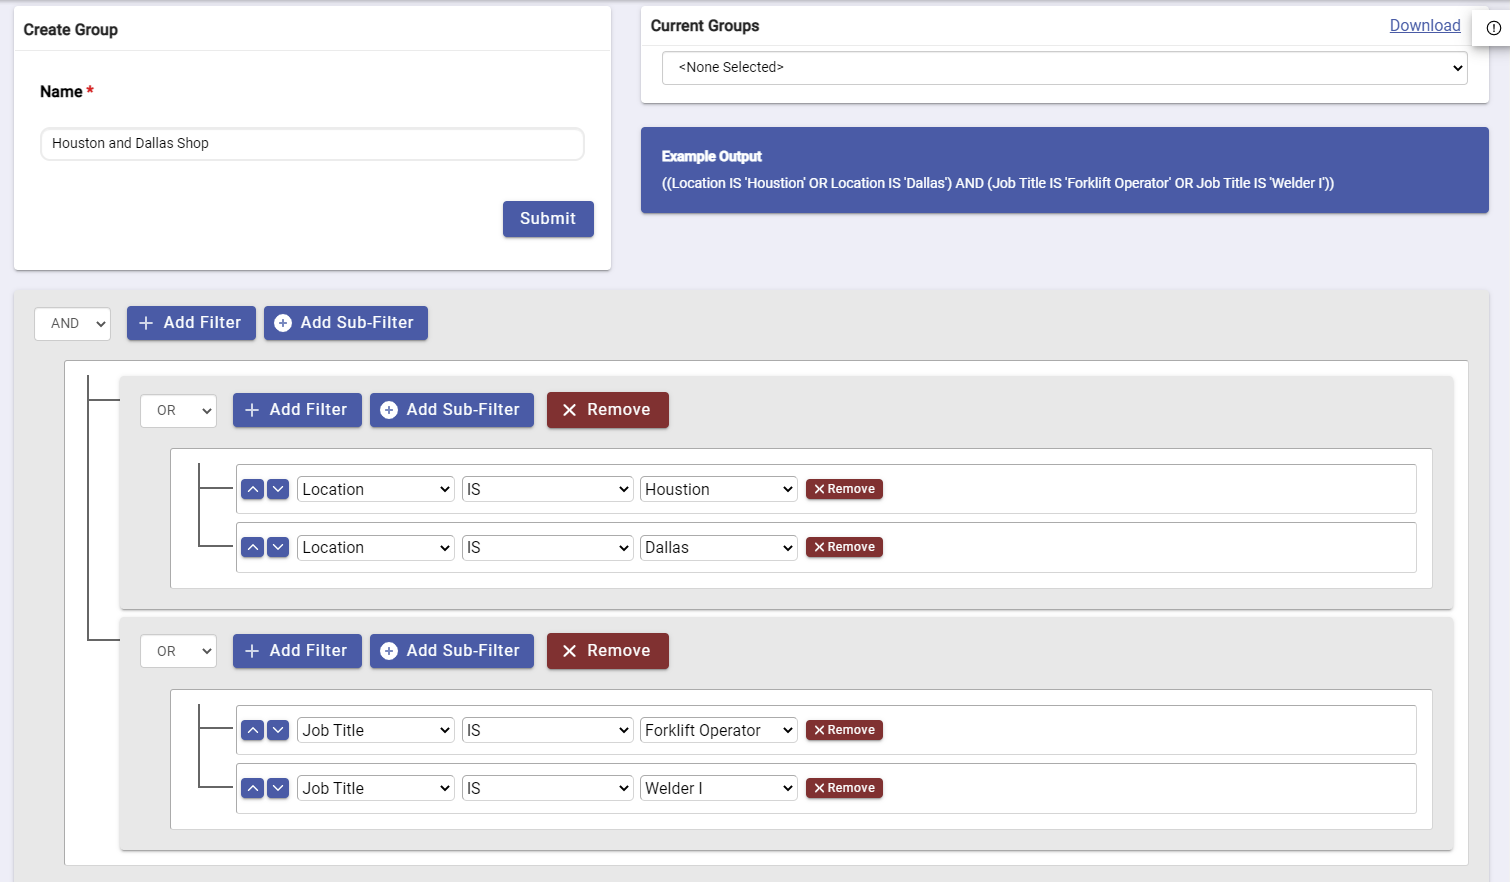
If you are uncertain about the statement you are building with your queries, the “Example Output” box located on the right-hand side will create a statement as you choose filters. In this box, the parentheses denote a level of filters, and anything in capital letters is a concatenator, such as AND, OR, IS, or IS NOT. When you are finished creating your queries, the statement in the “Example Output” section should reflect how you would like the system to filter and place users into that group.
Once you are finished building your group filters, click the blue “Submit” button under the “Create Group” section on the left.
If you have any questions or need assistance building groups, please contact SafetySkills Help Desk at support@safetyskills.com or call us at 405-463-6656, option 2.